Integrators
If you want to integrate Envi API into your SQL Server Data Tools and retrieve the needed data easily, you can use the following applications:
Before working with integrators, please see the following requirements and installation:
For SSIS Powerpack
- .NET Framework 3.5
- SSISPowerPackSetup_64bit
- SSDT (SSDT-Setup-ENU) for Analysis Services, Integration Services, or Reporting Services projects
For Linked Server
SSIS Powerpack
With the SSIS Powerpack tool, you can easily retrieve data from Envi OData API and insert into the MSSQL database. To do it:
Create JSON Source
- Download and install SSIS ZappySys PowerPack.
-
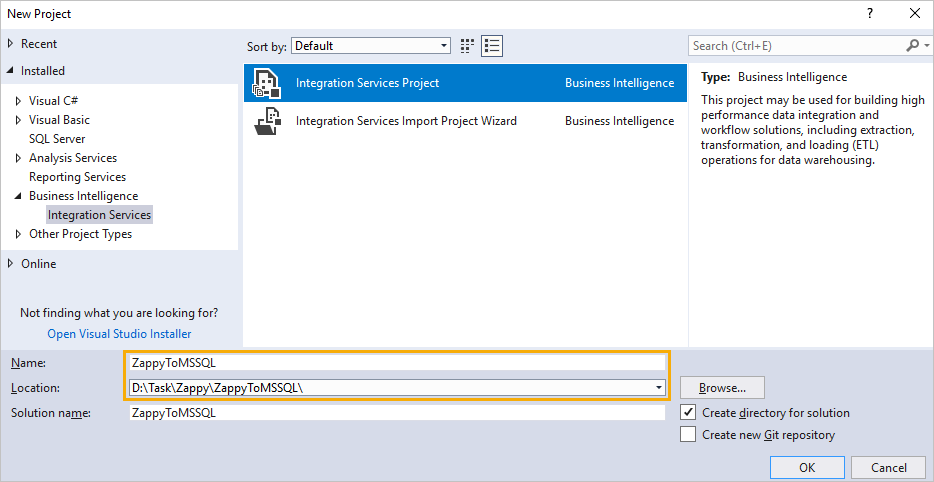
After installation, open Microsoft SQL Server Data Tool for Visual Studio (SSDT) and create a new Integration Services Project. For this, on the File tab, select New Project.
Note
Select a location where to save the project and name it.
-
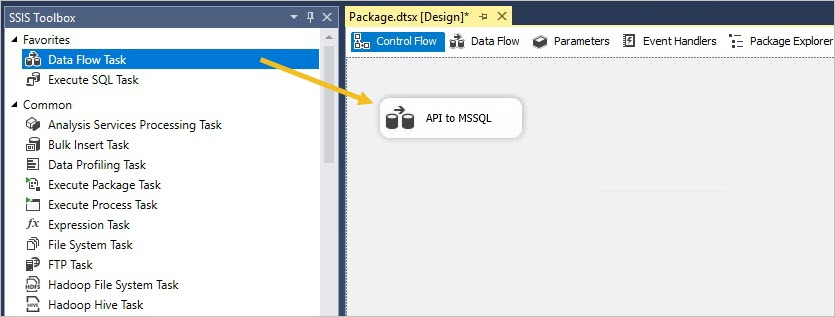
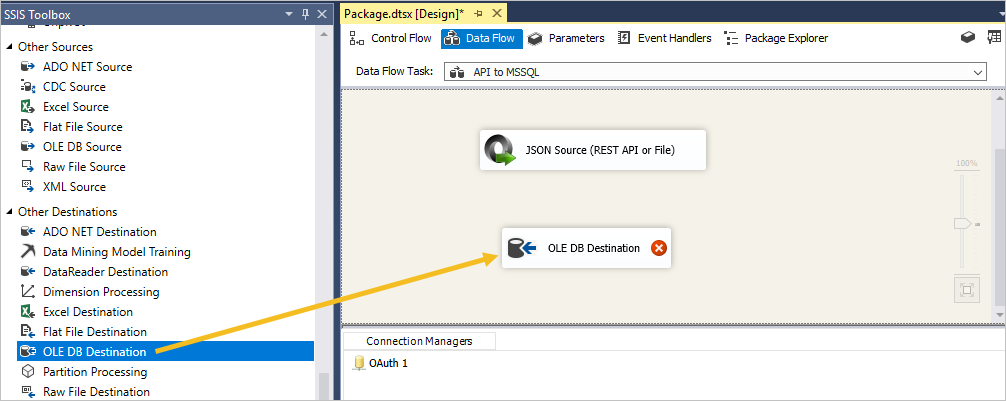
Add Data Flow Task. For this, drag the ZS JSON Source (REST API or File) to the board.
Note
You can rename the task easily (for example, API to MSSQL). For this, just select the record.
-
Double-click the Data Flow Task to see the DataFlow Design dashboard.
Note
Also, you can select the Data Flow tab for this.
-
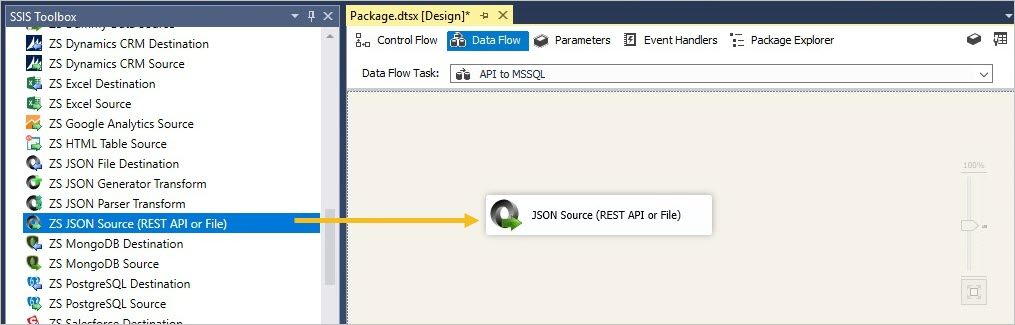
Drag the ZS JSON Source (REST API or File) to the board from the SSIS toolbox.
-
Double-click JSON Source (REST API or File) for the following configuration:
-
Enter the needed Path or Web URL, then add the appropriate query parameters:
(for example, <HOSTNAME> = api-demo.envi.net).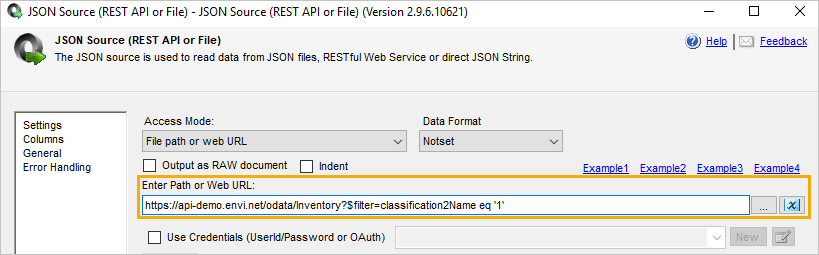
Note
You can use the following examples to retrieve the needed data:ExampleBefore adding new data flows to the existing one, disable previous items. For this, right-click the Data Flow Task and select Disable. After that, you’ll see the following result:Inventory items URL: https://api-demo.envi.net/odata/Inventory?$filter=classification2Name eq '1' Facilities URL: https://api-demo.envi.net/odata/Facilities Vendors URL: https:// api-demo.envi.net/odata/Vendors Disputed Invoices URL: https:// api-demo.envi.net/odata/MatchedInvoices?$filter=matchedInvoiceStatus eq 'Disputed' Pending Batches: https:// api-demo.envi.net/odata/Batches?$filter=batchStatus eq 'Pending'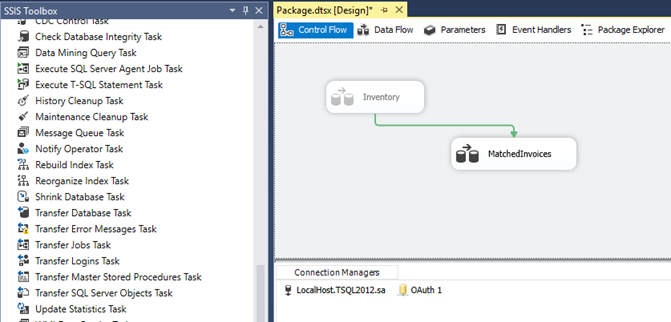
-
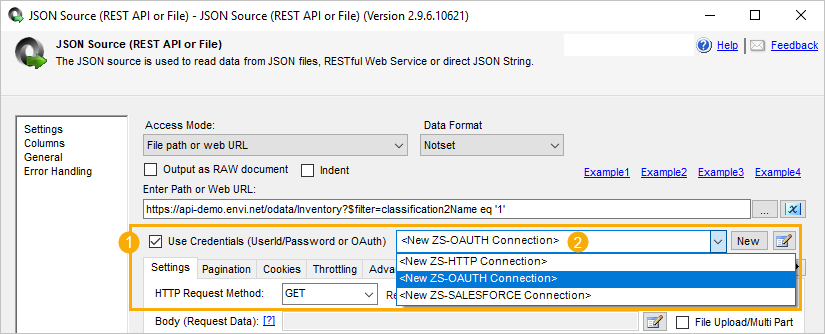
Select the Use Credentials checkbox. Then, from the dropdown menu, select the New ZS-OAuth Connection option.
-
-
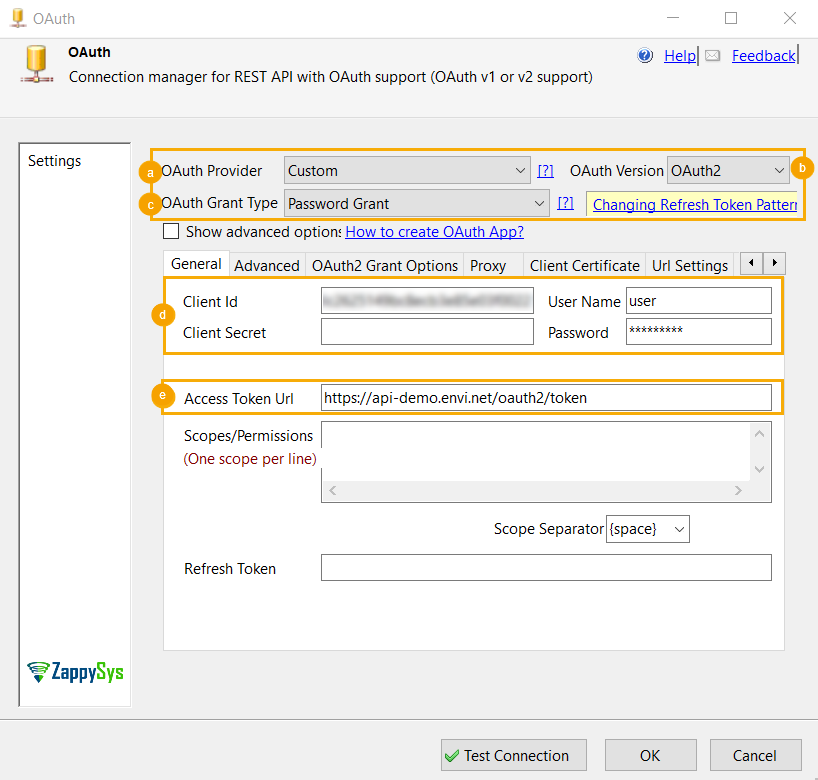
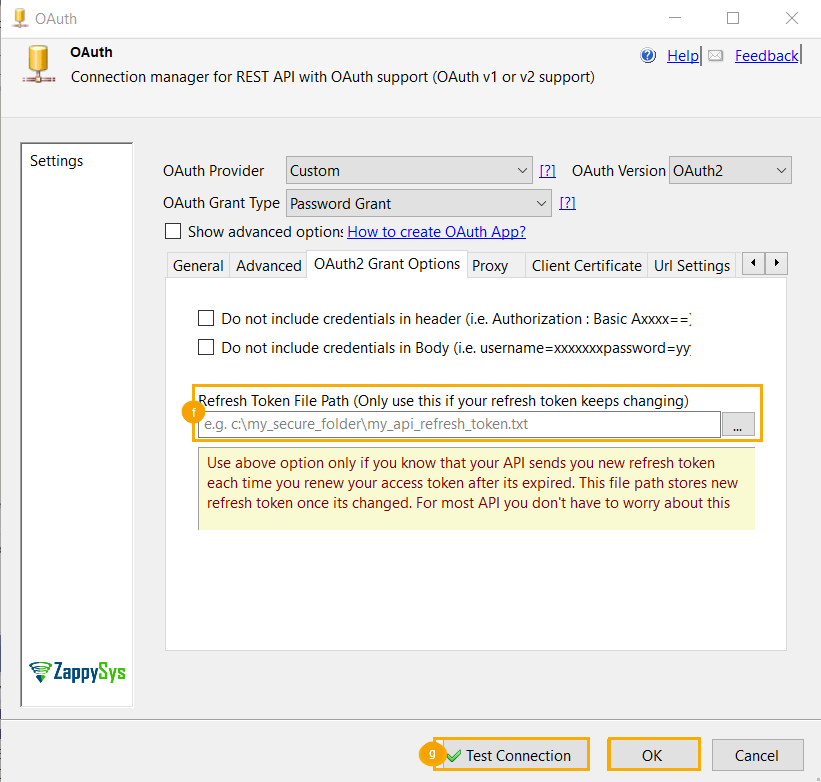
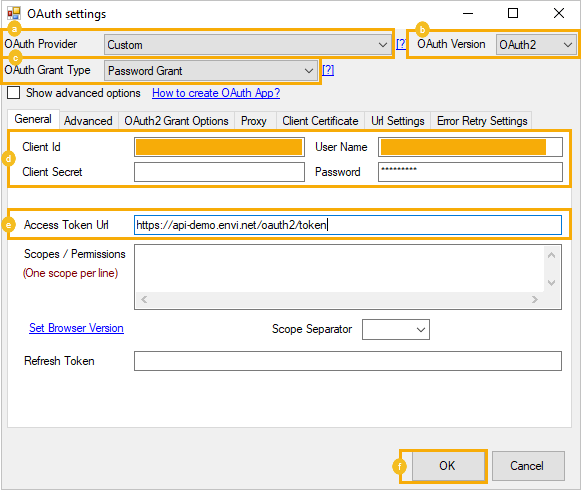
After selecting the New ZS-OAuth option, the OAuth dialog box is shown. Perform the following settings:
- From the OAuth Provider dropdown menu, select the Custom option.
- From the OAuth Version dropdown menu, select the OAuth2 option.
- From the OAuth Grant Type dropdown menu, select the Password Grant option.
- Enter Client ID, User Name, and Password.
- Enter Access Token URL (for example,
api-demo.envi.net/oauth2/token).
-
Go to the OAuth2 Grand Options tab, select the ellipsis (…) button, and provide a refresh token file path.
Note
The file name extension should be .txt. The file should be empty.
Note
Place the file in a separate and non-shared folder.
-
Select Test Connection, then OK.
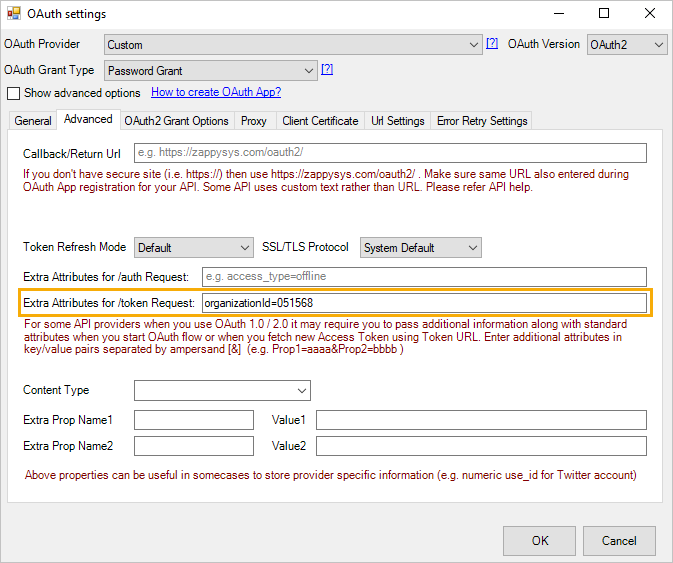
Note
If you want to sign in to an organization that is not your default one, go to the Advanced tab of the OAuth settings, then in the Extra Attributes for /token Request field, specify the ID of the needed organization as an additional parameter with the organizationId value:
-
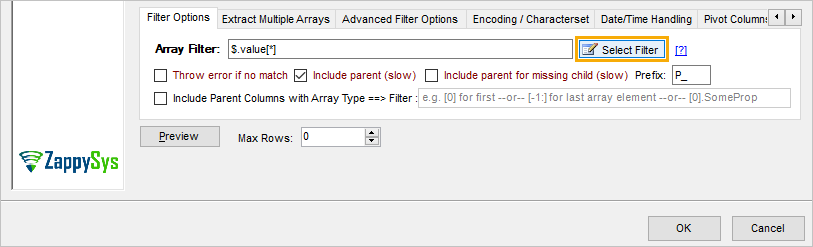
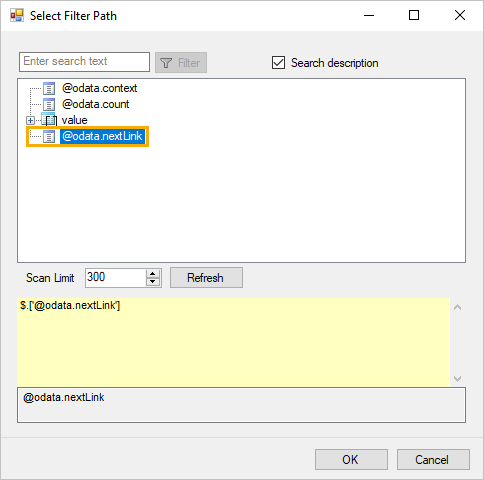
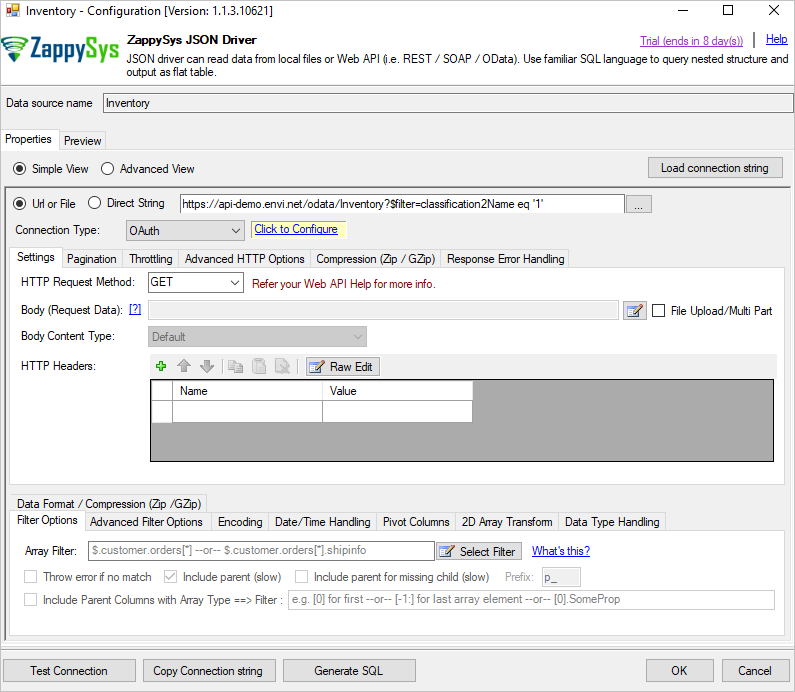
On the Filter Options tab, select the Select Filter button.
Note
Ensure that OAuth 2 is preselected.
-
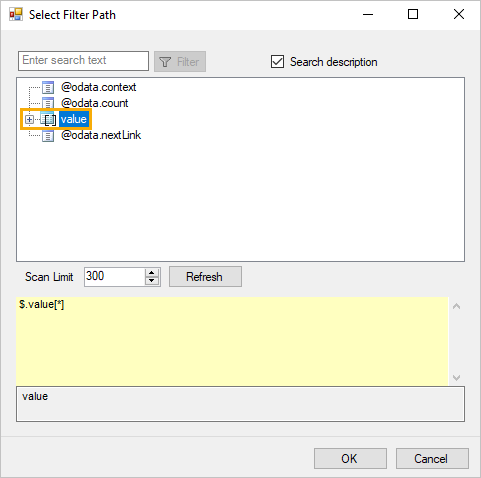
Select the value filter path, then select OK.
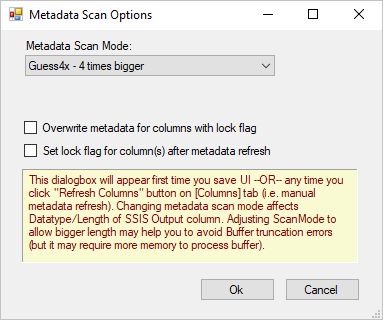
- Then, you will see the Metadata Scan Options dialog box. There, select OK.
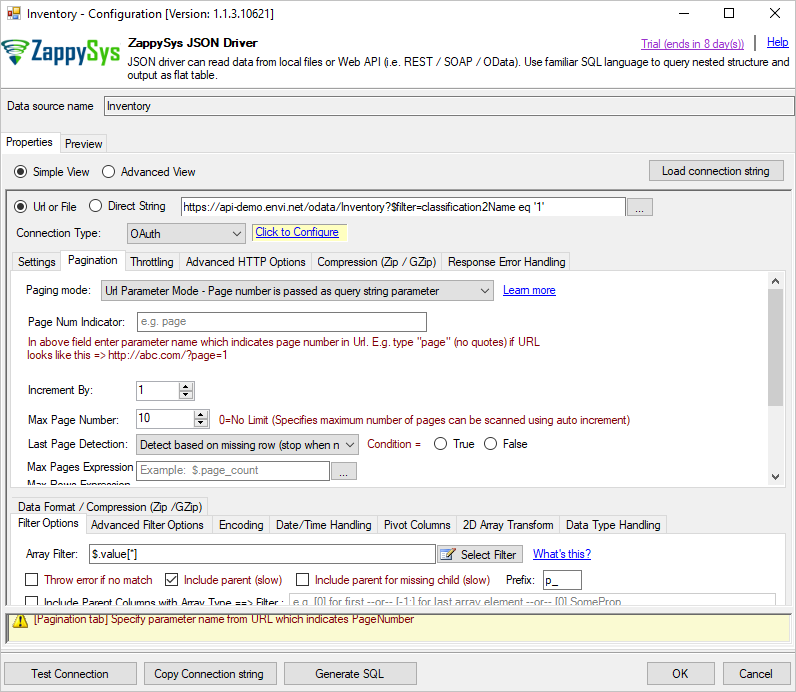
- In the JSON Source (REST API or File) dialog box, select the Pagination tab.
- From the Next Link/Cursor Expression field, select the ellipsis (…) button.
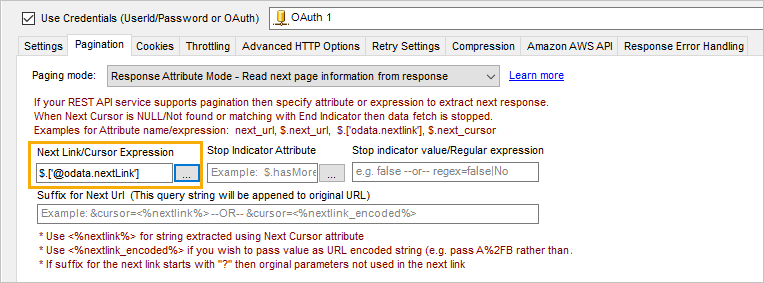
- Select @odata.nextLink, then select OK.
-
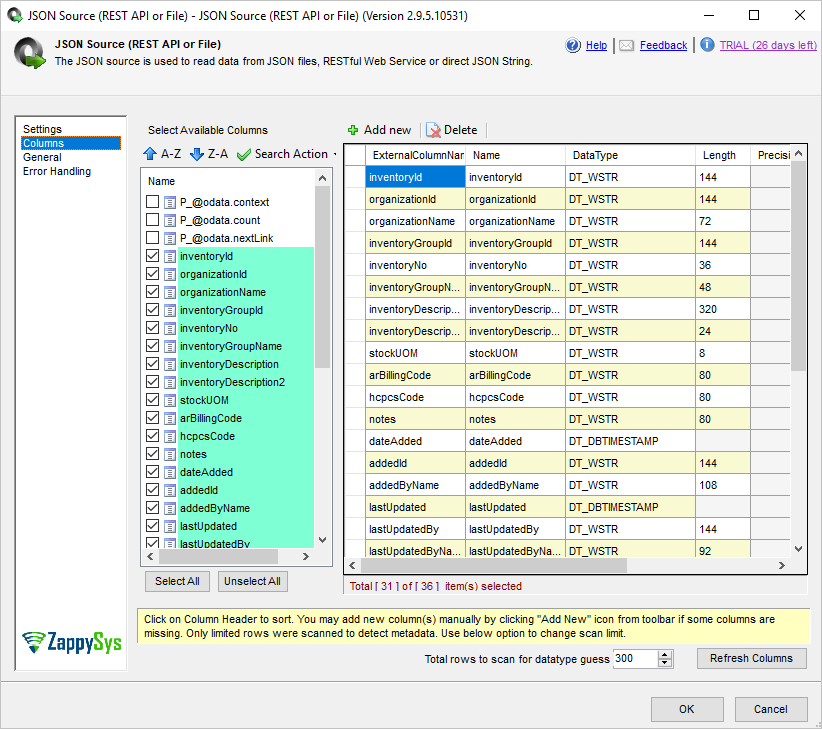
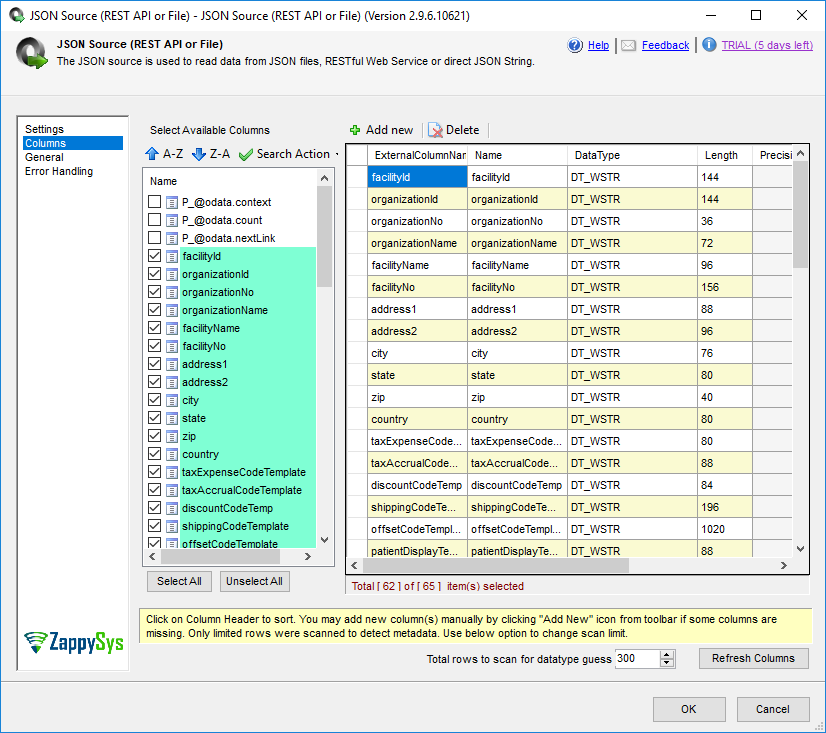
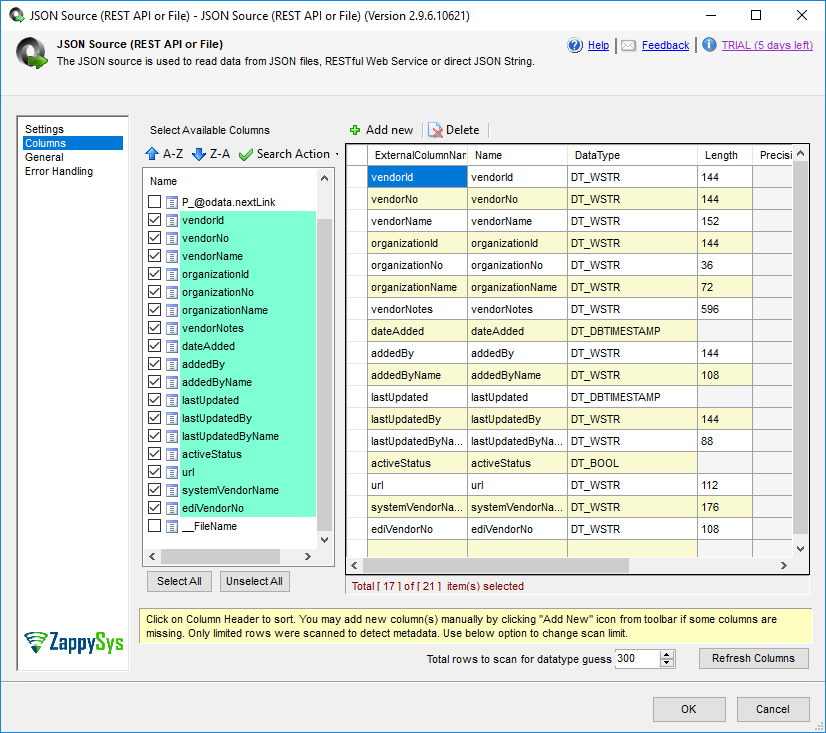
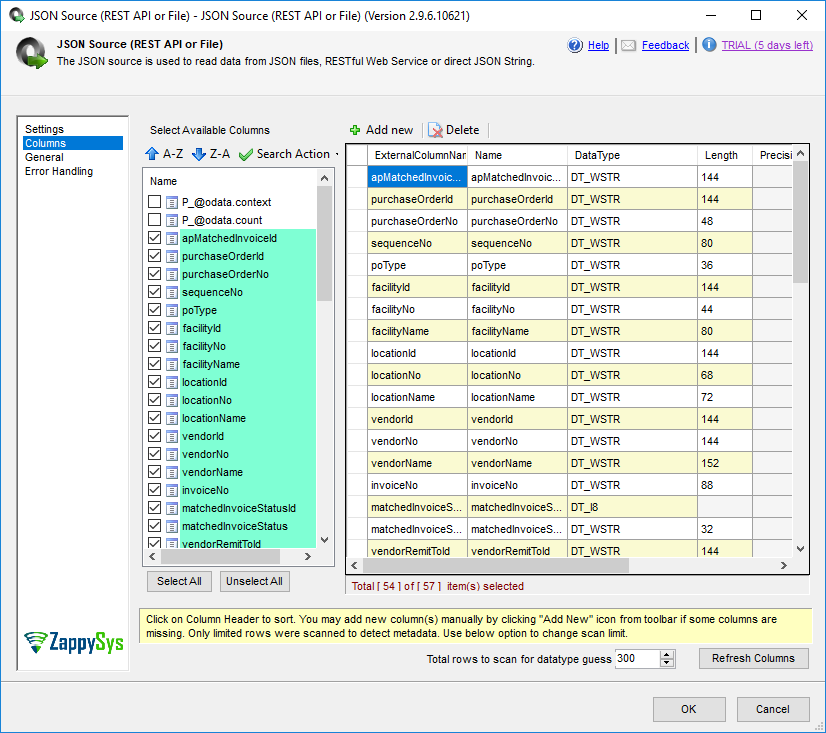
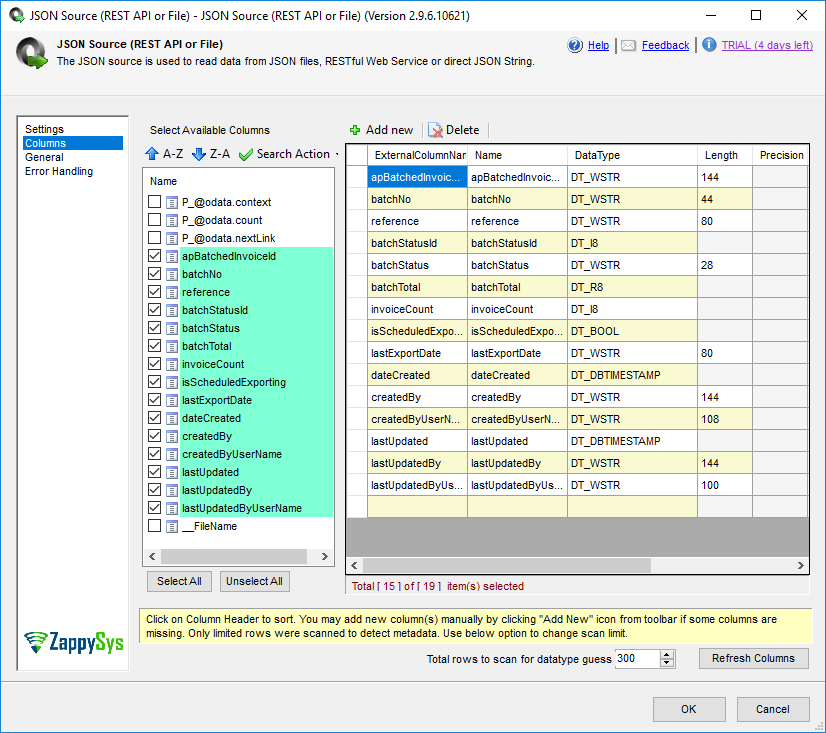
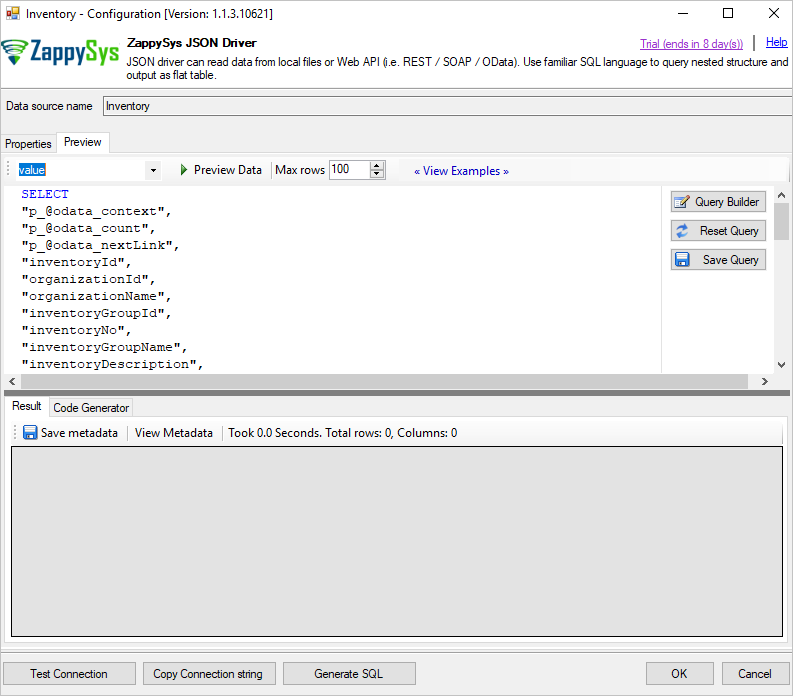
In the JSON Source (REST API or File) dialog box, go to the Columns section and then select the needed fields. Select OK.
Facility Columns
Vendor Columns
Disputed Matched Invoice Columns
Pending Batches Columns
The JSON Source setup is completed. Go to the JSON Source (REST API or File) dialog box, then in the Settings section, select Preview to view the retrieved data. 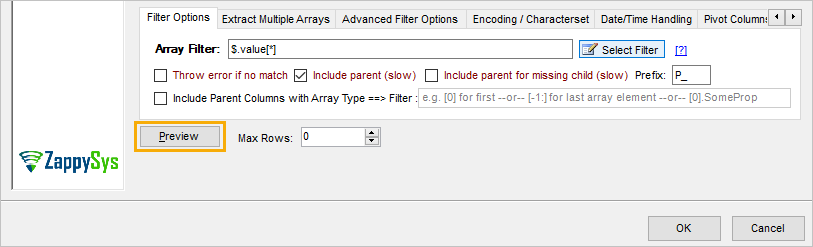
The data is retrieved successfully. 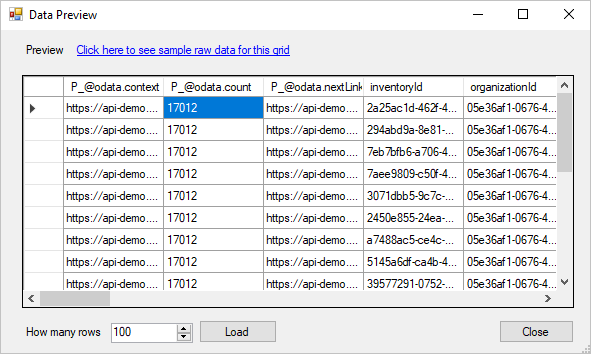
Build database schema in MS SQL Server
-
In MS SQL Studio, create a needed table.
Note
For this, create a new database or add the table to the existing one. Column data types should be taken from the 14th step of the previous section.
Inventory Table
CREATE TABLE [dbo].[Inventory](
[inventoryId] [nvarchar](144) NOT NULL,
[organizationId] [nvarchar](144) NOT NULL,
[organizationName] [nvarchar](255) NULL,
[inventoryGroupId] [nvarchar](144) NULL,
[inventoryNo] [nvarchar](255) NULL,
[inventoryGroupName] [nvarchar](255) NULL,
[inventoryDescription] [nvarchar](320) NULL,
[inventoryDescription2] [nvarchar](255) NULL,
[stockUOM] [nvarchar](50) NULL,
[arBillingCode] [nvarchar](80) NULL,
[hcpcsCode] [nvarchar](80) NULL,
[notes] [nvarchar](255) NULL,
[dateAdded] [datetime2](7) NULL,
[addedId] [nvarchar](144) NULL,
[addedByName] [nvarchar](255) NULL,
[lastUpdated] [datetime2](7) NULL,
[lastUpdatedBy] [nvarchar](144) NULL,
[lastUpdatedByName] [nvarchar](100) NULL,
[activeStatus] [bit] NULL,
[unspscCode] [nvarchar](80) NULL,
[isLatex] [bit] NULL,
[classificationId] [nvarchar](144) NULL,
[classificationName] [nvarchar](100) NULL,
[classification2Id] [nvarchar](144) NULL,
[classification2Name] [nvarchar](100) NULL,
[defaultExpenseLedgerNo] [nvarchar](100) NULL,
[defaultAssetLedgerNo] [nvarchar](100) NULL,
[periopCategoryId] [nvarchar](144) NULL,
[periopItemCategory] [nvarchar](100) NULL,
[systemTypeId] [int] NULL,
[systemType] [nvarchar](100) NULL,
[defaultIsBillable] [bit] NULL
) ON [PRIMARY]
GO
Facility Table
CREATE TABLE [dbo].[Facilities](
[facilityId] [nvarchar](144) NOT NULL,
[organizationId] [nvarchar](144) NULL,
[organizationNo] [nvarchar](36) NULL,
[organizationName] [nvarchar](72) NULL,
[facilityName] [nvarchar](96) NULL,
[facilityNo] [nvarchar](156) NULL,
[address1] [nvarchar](255) NULL,
[address2] [nvarchar](255) NULL,
[city] [nvarchar](76) NULL,
[state] [nvarchar](80) NULL,
[zip] [nvarchar](40) NULL,
[country] [nvarchar](80) NULL,
[taxExpenseCodeTemplate] [nvarchar](255) NULL,
[taxAccrualCodeTemplate] [nvarchar](255) NULL,
[discountCodeTemp] [nvarchar](84) NULL,
[shippingCodeTemplate] [nvarchar](255) NULL,
[offsetCodeTemplate] [nvarchar](1020) NULL,
[patientDisplayTemplate] [nvarchar](255) NULL,
[poglCodeDisplayTemplate] [nvarchar](80) NULL,
[poDeptDisplayTemplate] [nvarchar](80) NULL,
[activeStatus] [bit] NULL,
[inventoryGroupId] [nvarchar](144) NULL,
[inventoryGroupNo] [nvarchar](44) NULL,
[inventoryGroupName] [nvarchar](56) NULL,
[apToleranceLevel] [decimal](18, 4) NULL,
[apToleranceLevelType] [tinyint] NULL,
[apToleranceLevelTypeValue] [nvarchar](255) NULL,
[apToleranceLevel2] [decimal](18, 4) NULL,
[apToleranceLevel2Type] [tinyint] NULL,
[apToleranceLevel2TypeValue] [nvarchar](255) NULL,
[apFreeFormedToleranceLevel] [decimal](18, 4) NULL,
[apFreeFormedToleranceLevelType] [tinyint] NULL,
[apFreeFormedToleranceLevelTypeValue] [nvarchar](255) NULL,
[apFreeFormedToleranceLevel2] [decimal](18, 4) NULL,
[apFreeFormedToleranceLevel2Type] [tinyint] NULL,
[apFreeFormedToleranceLevel2TypeValue] [nvarchar](255) NULL,
[apOffsetTolerance] [decimal](18, 4) NULL,
[apOffsetToleranceType] [tinyint] NULL,
[apOffsetToleranceTypeValue] [nvarchar](4) NULL,
[taxType] [tinyint] NULL,
[taxTypeValue] [nvarchar](4) NULL,
[taxAmount] [decimal](18, 4) NULL,
[taxExpenseType] [tinyint] NULL,
[taxExpenseTypeValue] [nvarchar](4) NULL,
[taxExpenseAmount] [tinyint] NULL,
[facilityNoXref] [nvarchar](255) NULL,
[taxShipping] [bit] NULL,
[poGlValidation] [nvarchar](255) NULL,
[poGlValidationMsg] [nvarchar](255) NULL,
[capitalPOGlValidation] [nvarchar](80) NULL,
[capitalPOGlValidationMsg] [nvarchar](255) NULL,
[timeZoneId] [nvarchar](144) NULL,
[timeZone] [nvarchar](255) NULL,
[preferenceCardMatching] [tinyint] NULL,
[preferenceCardMatchingValue] [nvarchar](52) NULL,
[dateCreated] [datetime2](7) NULL,
[createdBy] [nvarchar](144) NULL,
[createdByName] [nvarchar](100) NULL,
[lastUpdated] [datetime2](7) NULL,
[lastUpdatedBy] [nvarchar](144) NULL,
[lastUpdatedByName] [nvarchar](88) NULL
[memberID] [nvarchar](144) NULL,
[capitalTaxExpenseCodeTemplate] [nvarchar](255) NULL,
[capitalTaxAccrualCodeTemplate] [nvarchar](255) NULL,
[capitalDiscountCodeTemplate] [nvarchar](255) NULL,
[capitalShippingCodeTemplate] [nvarchar](255) NULL,
[capitalOffsetCodeTemplate] [nvarchar](255) NULL,
) ON [PRIMARY]
GO
Vendor Table
CREATE TABLE [dbo].[Vendors](
[vendorId] [nvarchar](144) NOT NULL,
[vendorNo] [nvarchar](144) NULL,
[vendorName] [nvarchar](152) NULL,
[organizationId] [nvarchar](144) NULL,
[organizationNo] [nvarchar](36) NULL,
[organizationName] [nvarchar](72) NULL,
[vendorNotes] [nvarchar](596) NULL,
[dateAdded] [datetime2](7) NULL,
[addedBy] [nvarchar](144) NULL,
[addedByName] [nvarchar](108) NULL,
[lastUpdated] [datetime2](7) NULL,
[lastUpdatedBy] [nvarchar](144) NULL,
[lastUpdatedByName] [nvarchar](88) NULL,
[activeStatus] [bit] NULL,
[url] [nvarchar](255) NULL,
[systemVendorName] [nvarchar](176) NULL,
[ediVendorNo] [nvarchar](108) NULL
) ON [PRIMARY]
GO
Disputed Matched Invoice Table
CREATE TABLE [dbo].[MatchedInvoices](
[apMatchedInvoiceId] [nvarchar](144) NOT NULL,
[purchaseOrderId] [nvarchar](144) NULL,
[purchaseOrderNo] [nvarchar](48) NULL,
[sequenceNo] [nvarchar](80) NULL,
[poType] [nvarchar](36) NULL,
[facilityId] [nvarchar](144) NULL,
[facilityNo] [nvarchar](44) NULL,
[facilityName] [nvarchar](80) NULL,
[locationId] [nvarchar](144) NULL,
[locationNo] [nvarchar](68) NULL,
[locationName] [nvarchar](72) NULL,
[vendorId] [nvarchar](144) NULL,
[vendorNo] [nvarchar](144) NULL,
[vendorName] [nvarchar](152) NULL,
[invoiceNo] [nvarchar](88) NULL,
[matchedInvoiceStatusId] [bit] NULL,
[matchedInvoiceStatus] [nvarchar](32) NULL,
[vendorRemitToId] [nvarchar](144) NULL,
[remitToNo] [nvarchar](92) NULL,
[remitToDescription] [nvarchar](216) NULL,
[remitToVendorNo] [nvarchar](80) NULL,
[creditCardIDId] [nvarchar](144) NULL,
[creditCardID] [nvarchar](80) NULL,
[creditCardIDDescription] [nvarchar](92) NULL,
[reference] [nvarchar](80) NULL,
[notes] [nvarchar](1020) NULL,
[invoiceDate] [datetime2](7) NULL,
[invoiceDueDate] [datetime2](7) NULL,
[trackingCode] [nvarchar](1020) NULL,
[invoiceValidationTotal] [nvarchar](80) NULL,
[cerNoId] [nvarchar](1020) NULL,
[cerNo] [nvarchar](1020) NULL,
[cerNoDescription] [nvarchar](1020) NULL,
[discountAmount] [decimal](18, 4) NULL,
[taxAmount] [decimal](18, 4) NULL,
[shippingAmount] [decimal](18, 4) NULL,
[taxExpenseGLCode] [nvarchar](84) NULL,
[taxAccrualGLCode] [nvarchar](100) NULL,
[discountGLCode] [nvarchar](88) NULL,
[taxExpenseAmount] [decimal](18, 4) NULL,
[apBatchId] [nvarchar](1020) NULL,
[apBatchNo] [nvarchar](1020) NULL,
[taxCode] [nvarchar](80) NULL,
[receivedInvoiceId] [nvarchar](144) NULL,
[offset] [decimal](18, 4) NULL,
[offsetGLCode] [nvarchar](1020) NULL,
[createdBy] [nvarchar](144) NULL,
[createdByUserName] [nvarchar](108) NULL,
[dateCreated] [datetime2](7) NULL,
[lastUpdated] [datetime2](7) NULL,
[lastUpdatedBy] [nvarchar](144) NULL,
[lastUpdatedByUserName] [nvarchar](96) NULL,
[dateSubmitted] [datetime2](7) NULL,
[submittedBy] [nvarchar](144) NULL,
[submittedByUserName] [nvarchar](108) NULL
) ON [PRIMARY]
GO
Pending Batches Table
CREATE TABLE [dbo].[Batches]( [apBatchId] [nvarchar](144) NOT NULL, [batchNo] [nvarchar](44) NULL, [reference] [nvarchar](80) NULL, [batchStatusId] [tinyint] NULL, [batchStatus] [nvarchar](28) NULL, [batchTotal] [decimal](18, 4) NULL, [invoiceCount] [tinyint] NULL, [isScheduledExporting] [bit] NULL, [lastExportDate] [nvarchar](80) NULL, [dateCreated] [datetime2](7) NULL, [createdBy] [nvarchar](144) NULL, [createdByUserName] [nvarchar](108) NULL, [lastUpdated] [datetime2](7) NULL, [lastUpdatedBy] [nvarchar](144) NULL, [lastUpdatedByUserName] [nvarchar](100) NULL ) ON [PRIMARY] GO -
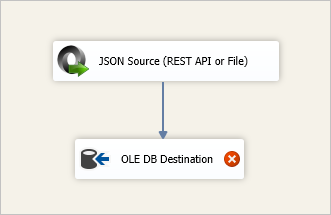
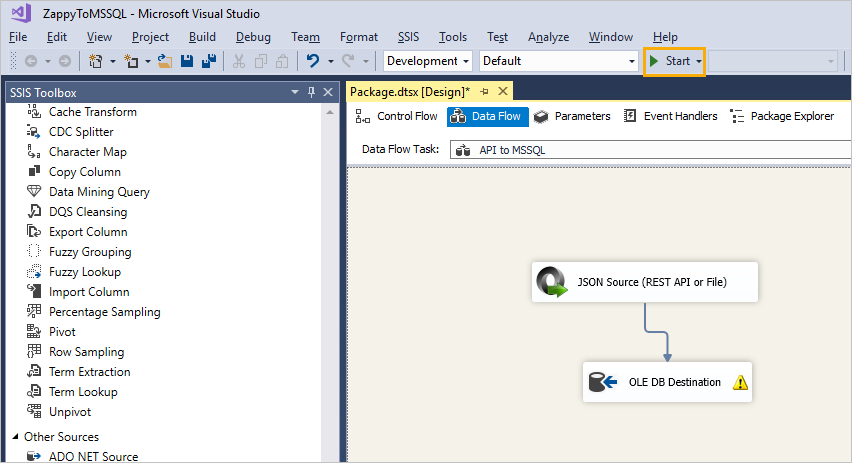
Add OLE DB Destination to the Data Flow Task. For this, drag Ole DB Destination to the board.
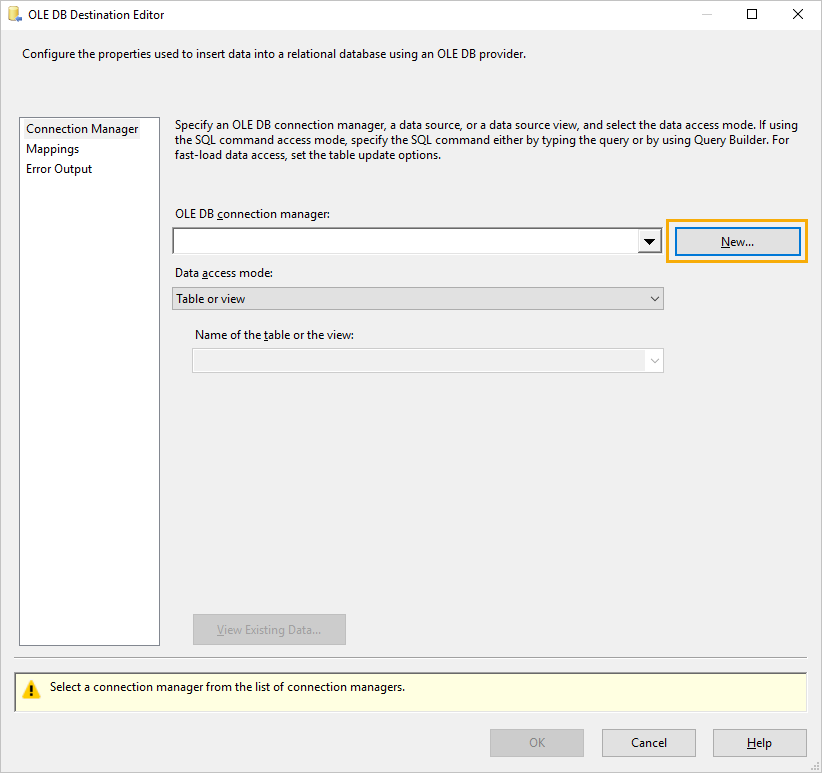
- Double-click Ole DB Destination for further configuration and select the New button.
- Once you see the following message, select Yes.

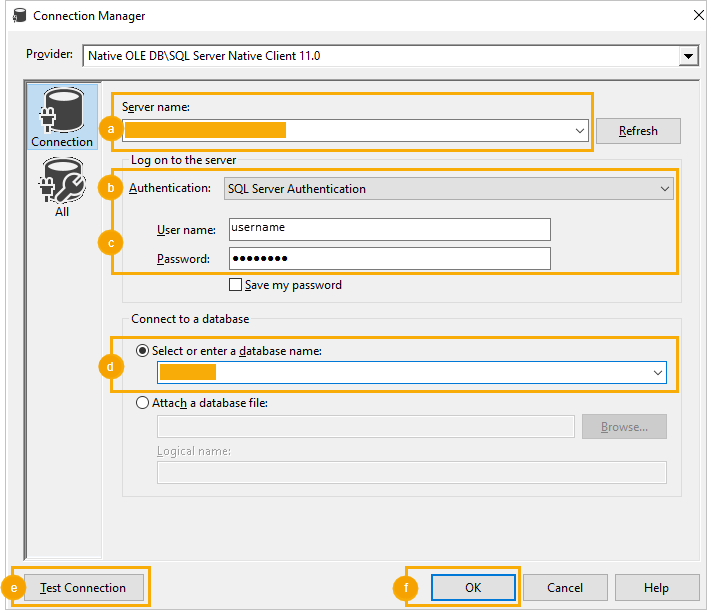
- In Configure OLE DB Connection Manager, select New.
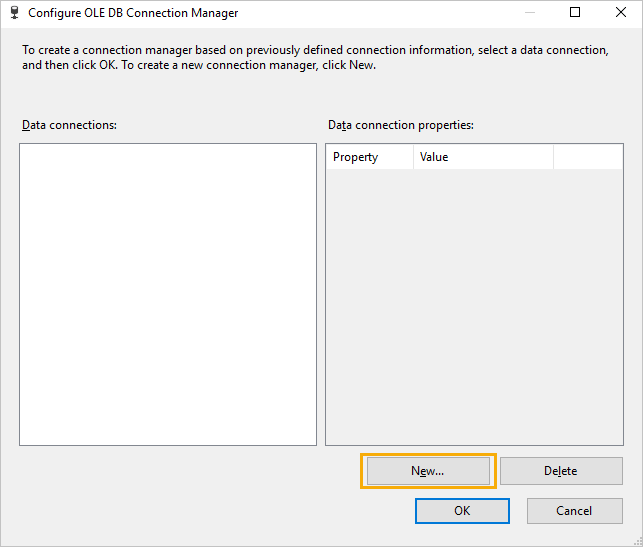
-
In the Connection Manager dialog box, perform the following steps:
- Add Server Name.
- Specify the type of Authentication.
- Enter credentials.
- Select or enter a database name.
- Select Test Connection.
- Select OK.
-
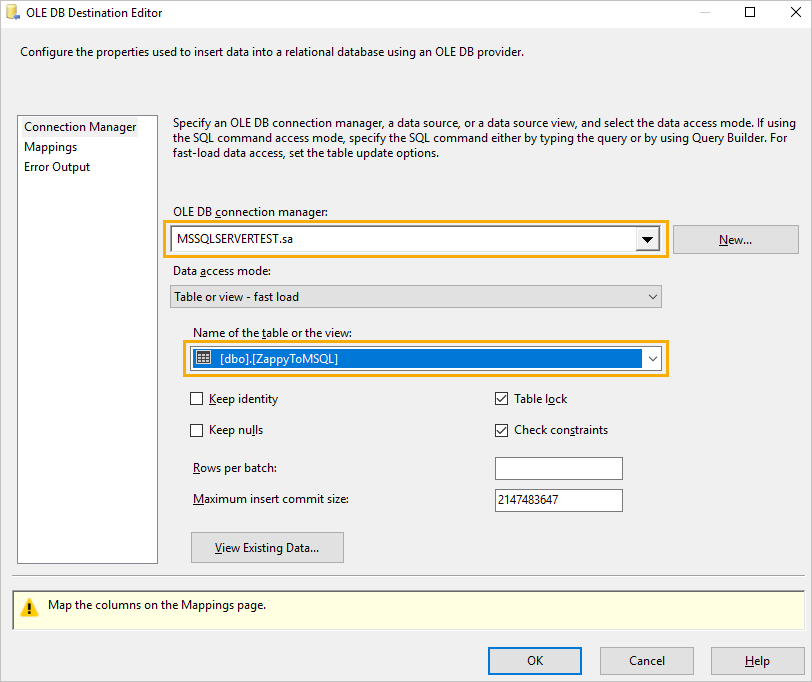
Select OLE DB connection manager, then select the table from the dropdown list and select OK.
- Connect items using the arrow. For this, select Json Source (REST API or File) and select the arrow.
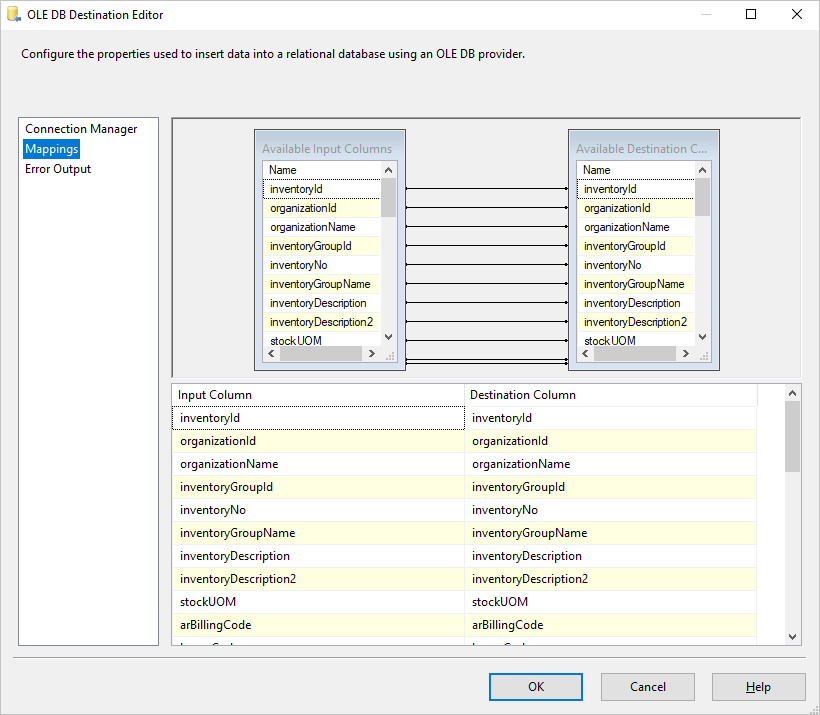
- Double-click OLE DB Destination. In OLE DB Destination Editor, go to the Mapping section to verify connections, and select OK.
Test SSIS Package
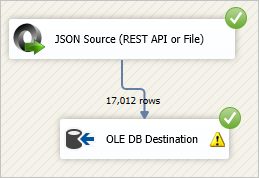
- To test the SSIS Package, select Start.
- After processing, you’ll see the successful solution result.
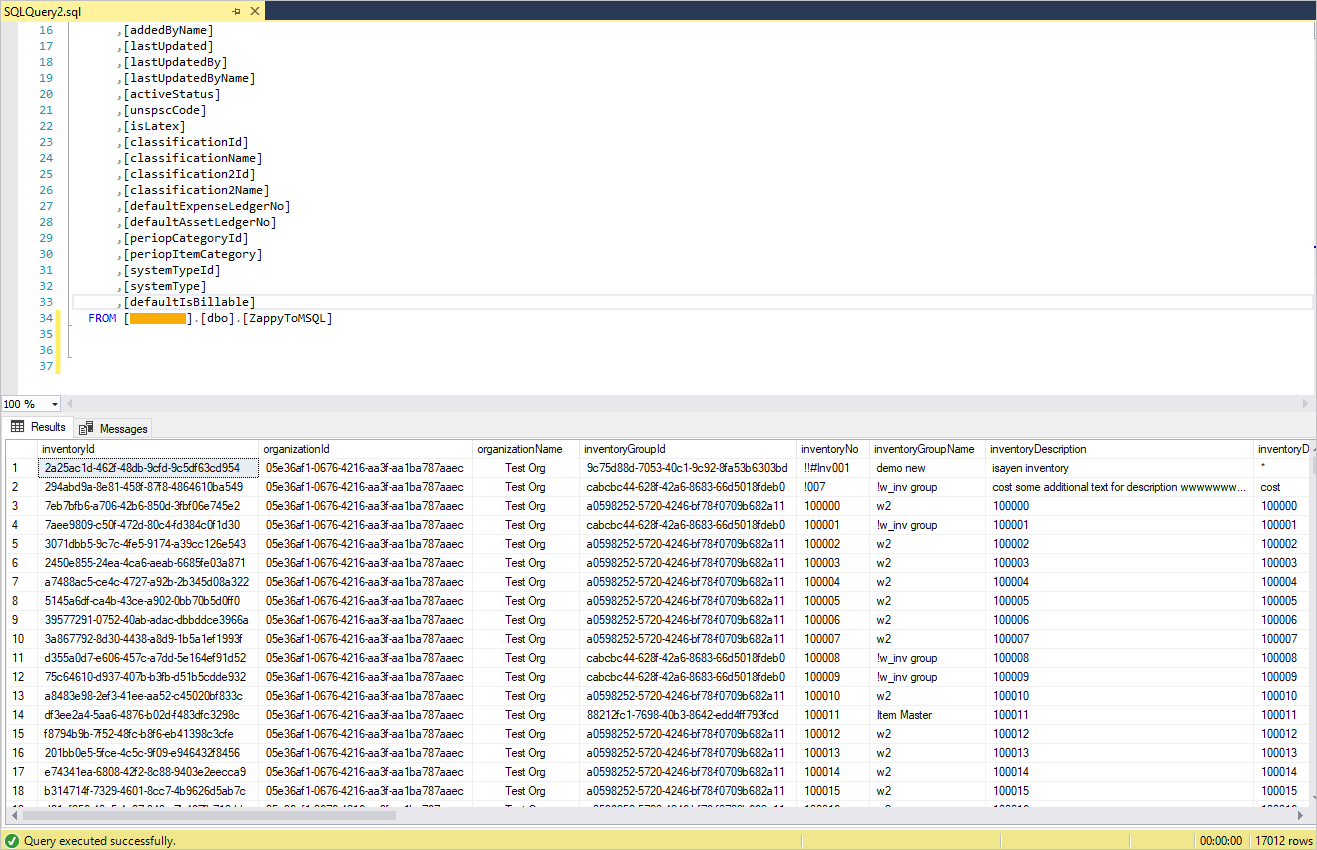
- Go to the MS SQL Server. Here, the successful test record will be shown.
ODBC Powerpack
ODBC Powerpack configuration
With the ODBC Powerpack tool, you can easily retrieve the data from Envi OData API and insert it into the MSSQL database. To do it:
- Download and install ODBC PowerPack.
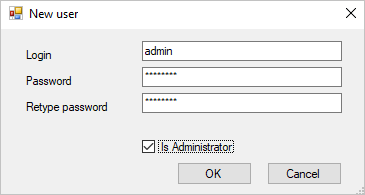
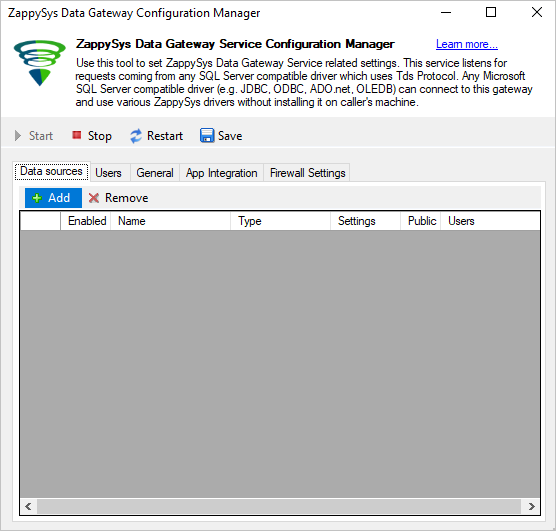
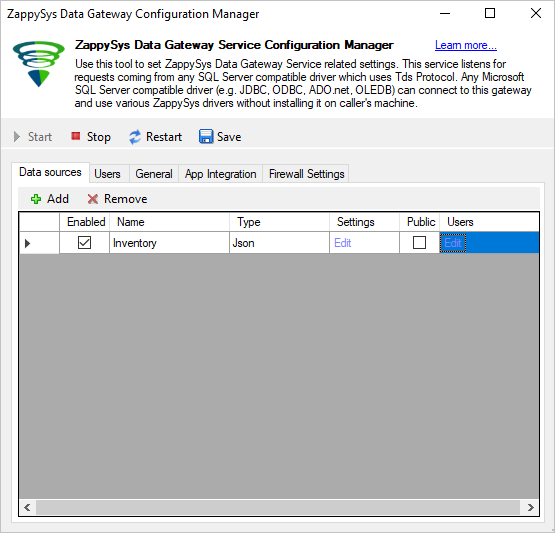
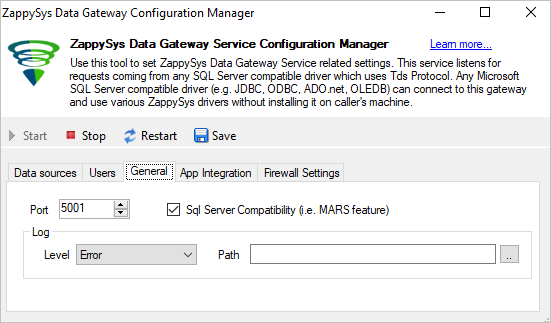
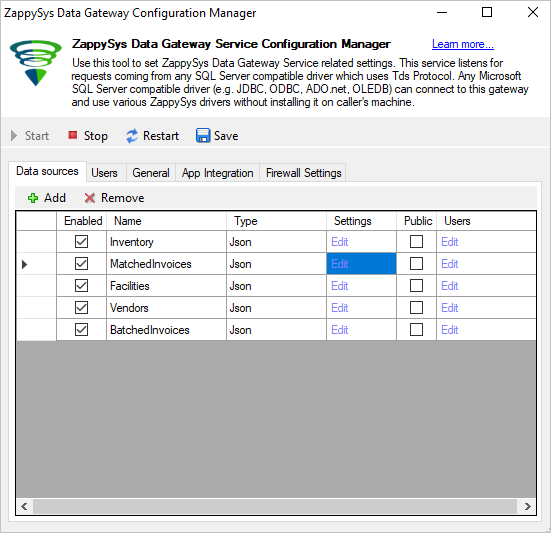
- After installation, open the ZappySys data gateway configuration manager. Go to the Users tab and select Add to add a new user.
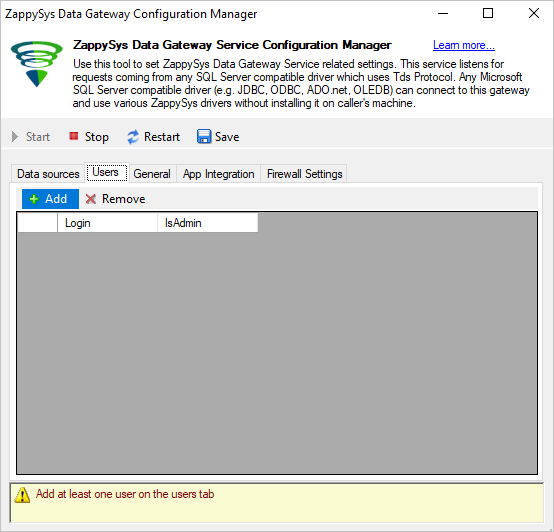
- Enter credentials, then select the Is Administrator checkbox and select OK.
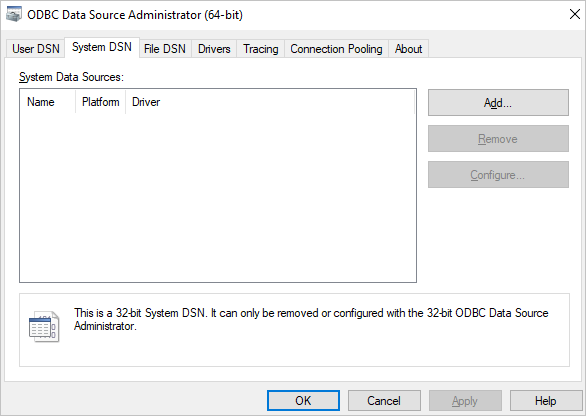
- In the Administrative Tools folder, select ODBC Data Source Administrator (64-bit). Then, go to the System DNS tab and Add a new data source.
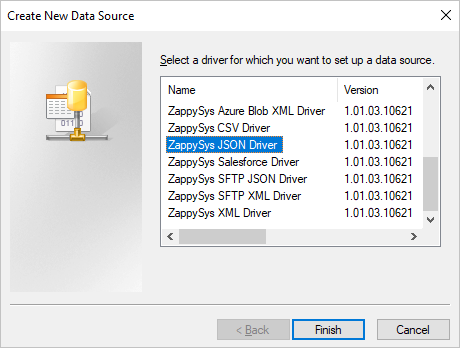
- Select the ZappySys JSON Driver value, then select Finish. In the ODBC Data Source Administrator (64-bit) dialog box, select OK.
- In Zappysys Data Gateway Configuration Manager, select Add to add a new data source.
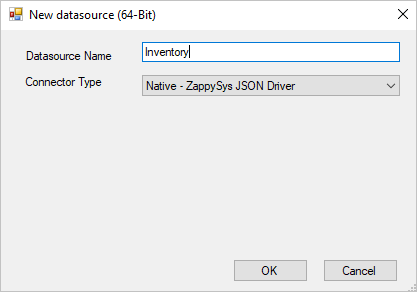
- Create Datasource Name and Connector Type, then select OK.
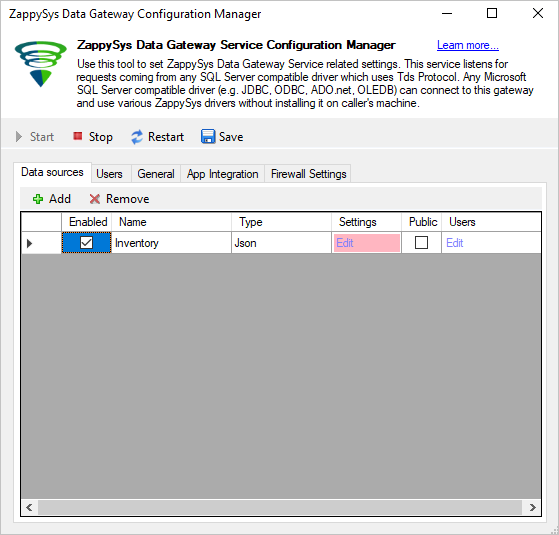
- In the Settings column, select Edit.
- Insert the needed URL with a query parameter, select OAuth Connection Type and GET HTTP Request Method. Then, Click to Configure OAuth Connection Type.
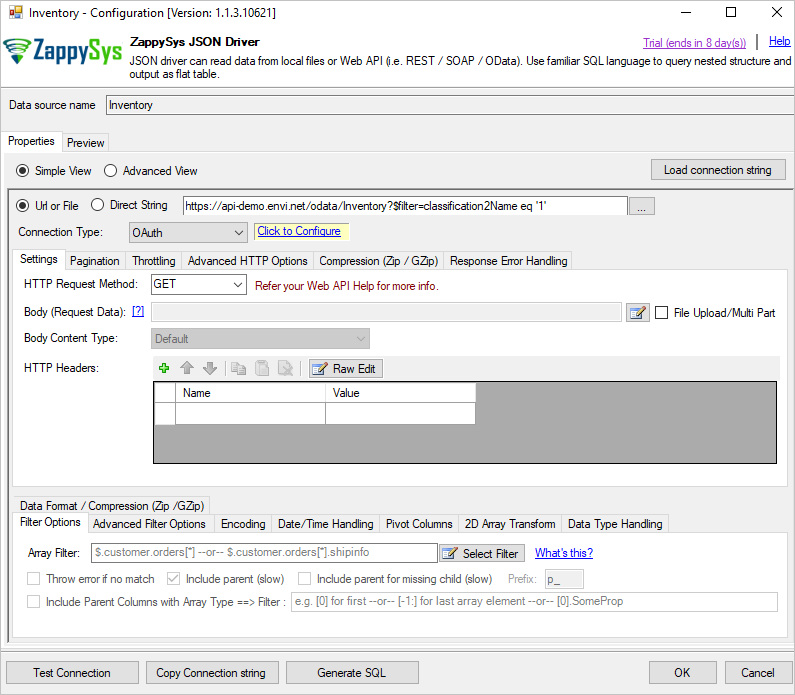
-
In the OAuth settings dialog box, perform the following steps:
- From the OAuth Provider dropdown menu, select the Custom option.
- From the OAuth Version dropdown menu, select the OAuth2 option.
- From the OAuth Grant Type dropdown menu, select the Password Grant option.
- Enter Client ID, User Name, and Password.
- Enter Access Token URL (for example,
api-demo.envi.net/oauth2/token). -
Select OK.
Note
If you want to sign in to an organization that is not your default one, go to the Advanced tab of OAuth settings, and then in the Extra Attributes for /token Request field, specify the ID of the needed organization as an additional parameter with the organizationId value:

-
If you need to modify pagination, go to the Pagination tab.
- Select the Select Filter button, then select the value filter path.
- Test the Connection.
-
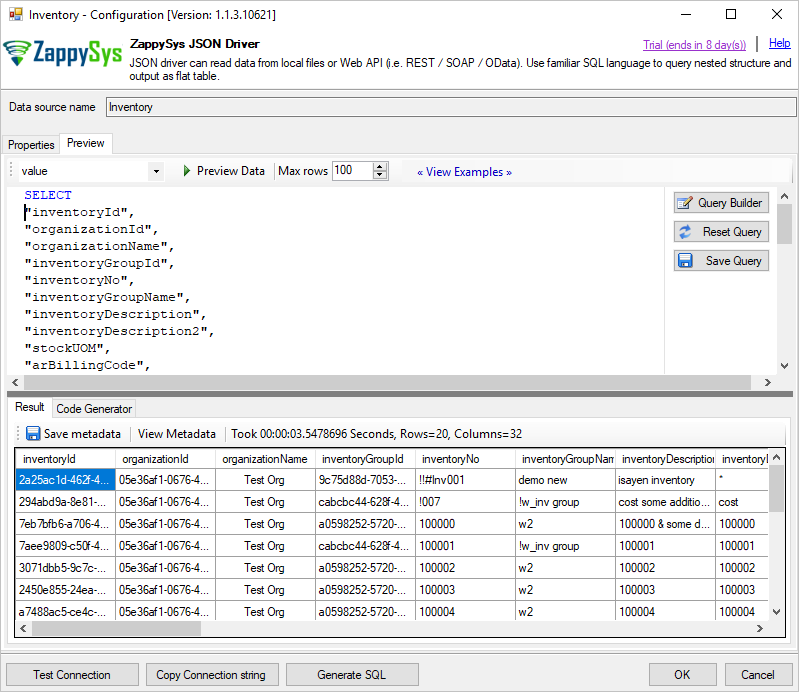
Go to the Preview tab, then select the value from the dropdown list.
Note
Copy the query if you need it for setting up the MS Excel and Power BI tools.
-
Correct fields if needed and click Preview Data.
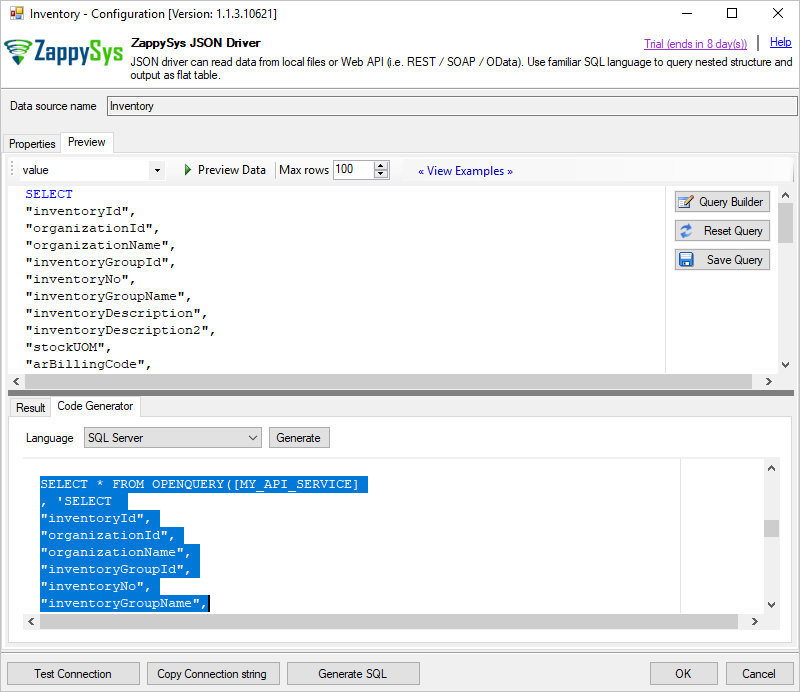
- Go to the Code Generator tab, then copy the query to MS SQL Management Studio and select OK.
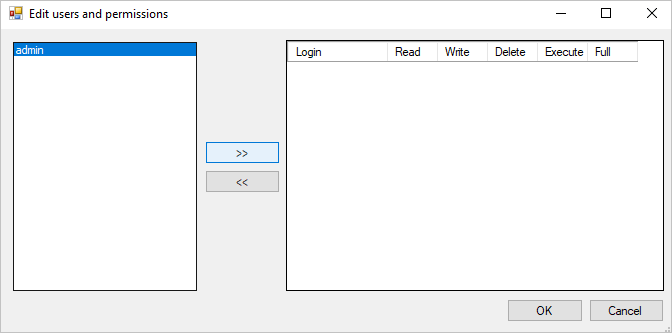
- In the Users column, select Edit.
- Add a previously created user to the data source, and then select Full access.
- Go to the General tab, edit Port if needed or use a default value. Select Save.
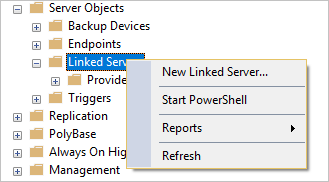
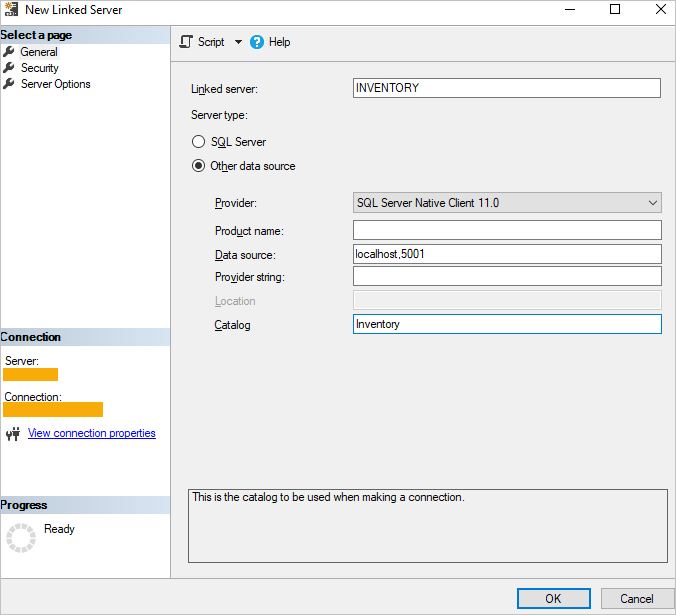
- Go to MS SQL Management Studio. Here, create a new Linked Server.
- Edit parameters.
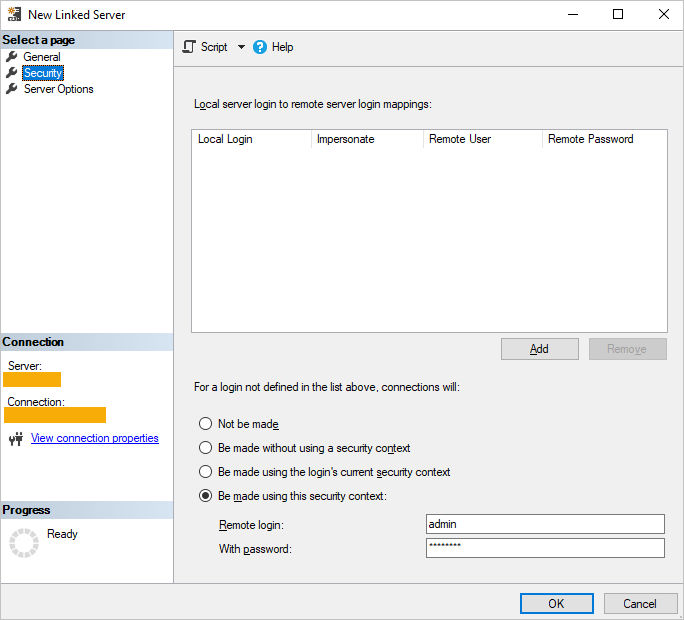
- Go to the Security tab, enter credentials and select OK.
-
Write the query.
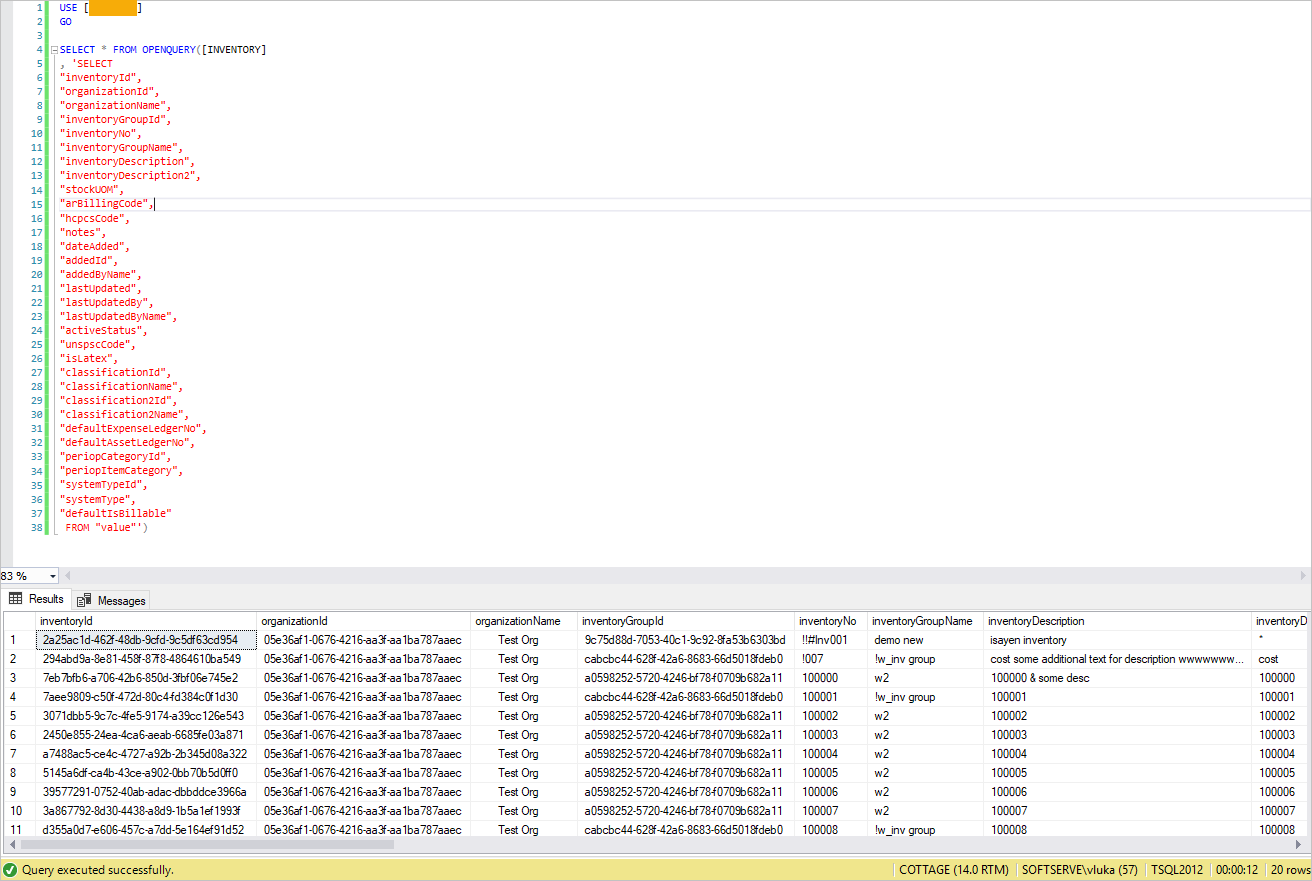
Use the following fields for Inventory items data:
Inventory Item Fields
USE [Database] GO -- SELECT * INTO inventory_odbc FROM OPENQUERY([INVENTORY] INSERT INTO [TSQL2012].[dbo].[Inventory] SELECT * FROM OPENQUERY([INVENTORY], 'SELECT "inventoryId", "organizationId", "organizationName", "inventoryGroupId", "inventoryNo", "inventoryGroupName", "inventoryDescription", "inventoryDescription2", "stockUOM", "arBillingCode", "hcpcsCode", "notes", "dateAdded", "addedId", "addedByName", "lastUpdated", "lastUpdatedBy", "lastUpdatedByName", "activeStatus", "unspscCode", "isLatex", "classificationId", "classificationName", "classification2Id", "classification2Name", "defaultExpenseLedgerNo", "defaultAssetLedgerNo", "periopCategoryId", "periopItemCategory", "systemTypeId", "systemType", "defaultIsBillable" FROM "value" ') -
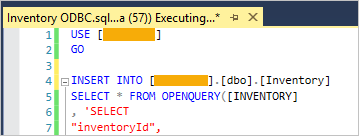
Load data into the table.
Note
You can write the query in the following way:

-
You’ll see the following notification on the Messages tab.
-
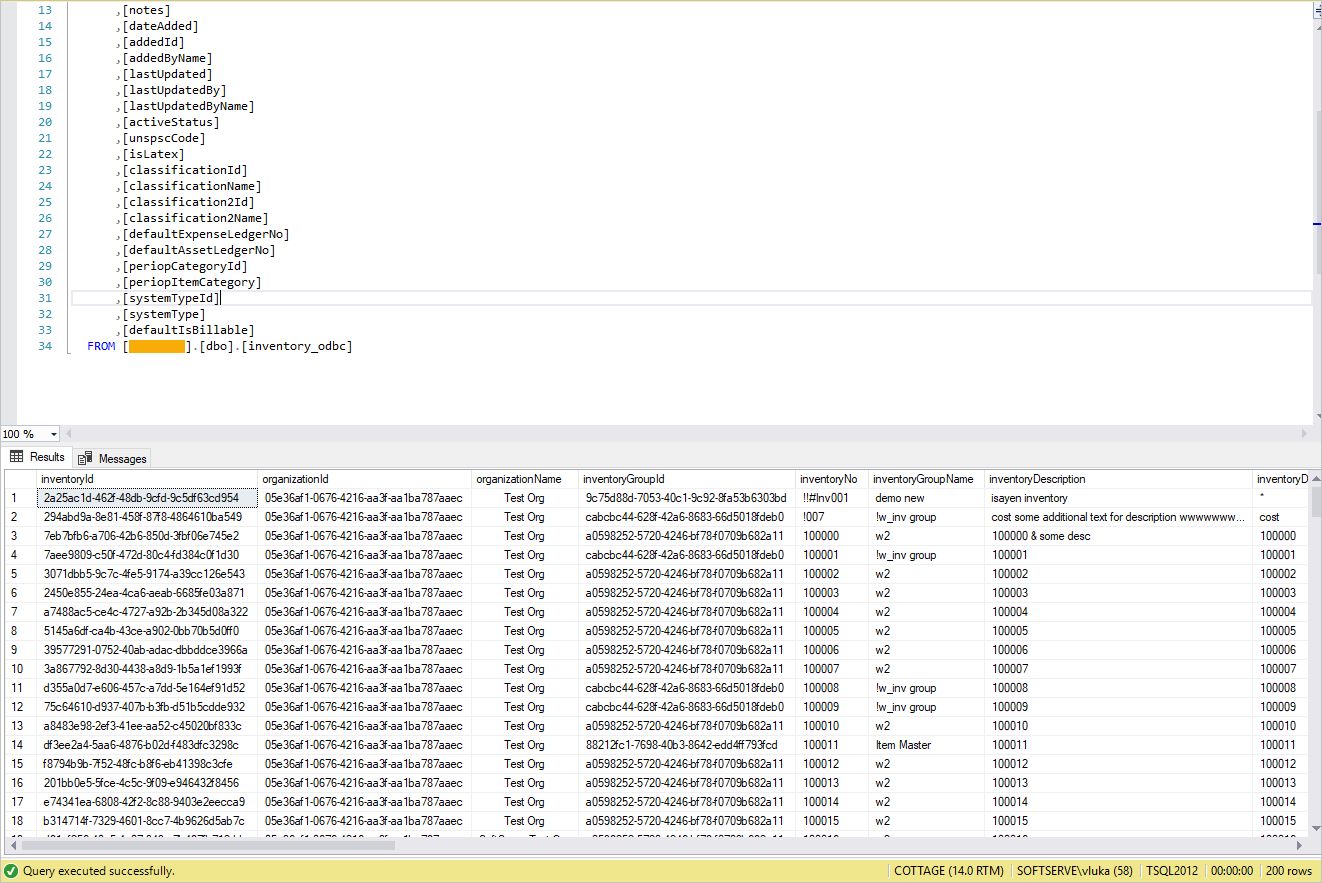
The Results tab will be the following:
For each new endpoint, add a new data source. The configuration flow is the same for every endpoint.
You can use the following examples of URLs for the Settings of the data source:
ExampleFacilities URL: https://api-demo.envi.net/odata/Facilities Vendors URL: https:// api-demo.envi.net/odata/Vendors Disputed Matched Invoices URL: https:// api-demo.envi.net/odata/MatchedInvoices?$filter=matchedInvoiceStatus eq 'Disputed' Pending Batches URL: https:// api-demo.envi.net/odata/Batches?$filter=batchStatus eq 'Pending'For example, you can use the following fields to retrieve Matched Invoice data:
Matched Invoice Fields
USE [Database]
GO

SELECT * FROM OPENQUERY([MATCHEDINVOICES]
, 'SELECT
"apMatchedInvoiceId",
"purchaseOrderId",
"purchaseOrderNo",
"sequenceNo",
"poType",
"facilityId",
"facilityNo",
"facilityName",
"locationId",
"locationNo",
"locationName",
"vendorId",
"vendorNo",
"vendorName",
"invoiceNo",
"matchedInvoiceStatusId",
"matchedInvoiceStatus",
"vendorRemitToId",
"remitToNo",
"remitToDescription",
"remitToVendorNo",
"creditCardIDId",
"creditCardID",
"creditCardIDDescription",
"reference",
"notes",
"invoiceDate",
"invoiceDueDate",
"trackingCode",
"invoiceValidationTotal",
"cerNoId",
"cerNo",
"cerNoDescription",
"discountAmount",
"taxAmount",
"shippingAmount",
"taxExpenseGLCode",
"taxAccrualGLCode",
"discountGLCode",
"taxExpenseAmount",
"apBatchId",
"apBatchNo",
"taxCode",
"receivedInvoiceId",
"offset",
"offsetGLCode",
"createdBy",
"createdByUserName",
"dateCreated",
"lastUpdated",
"lastUpdatedBy",
"lastUpdatedByUserName",
"submittedBy",
"submittedByUserName"
FROM "value"')

-- with filter
SELECT * FROM OPENQUERY([MATCHEDINVOICES]
, 'SELECT *
FROM "value"
WHERE "facilityNo" = "08"')
As a result, you’ll see the following page: 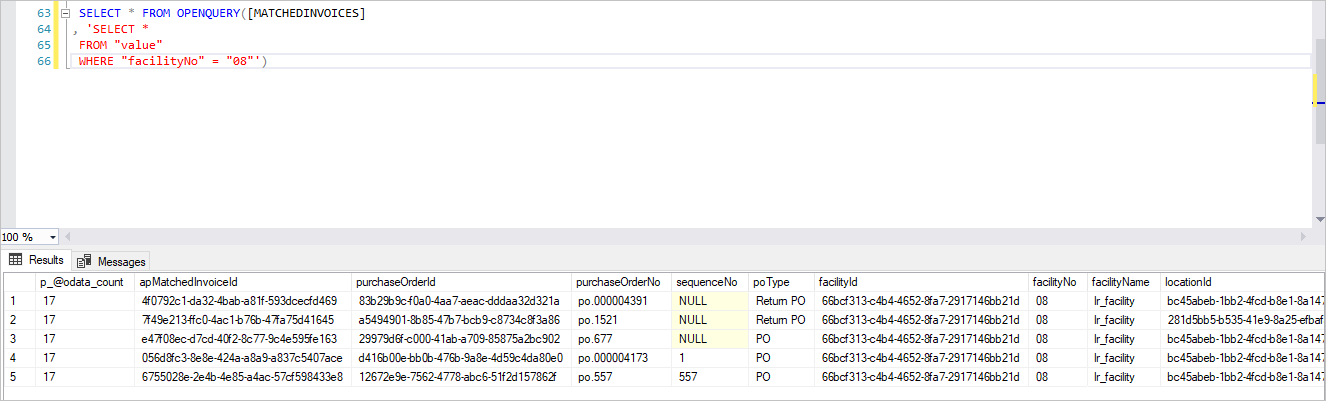
CData ODBC Driver for OData
With the CData ODBC Driver, you can easily retrieve the data from Envi OData API and insert it into the MSSQL database. To do it:
- Download OData ODBC Driver.
- Install and run ODataODBCDriver.exe.
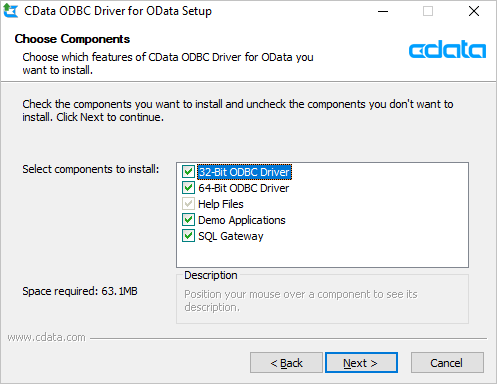
- On the Choose Components page, make sure the SQL Gateway checkbox is selected, and then select Next.
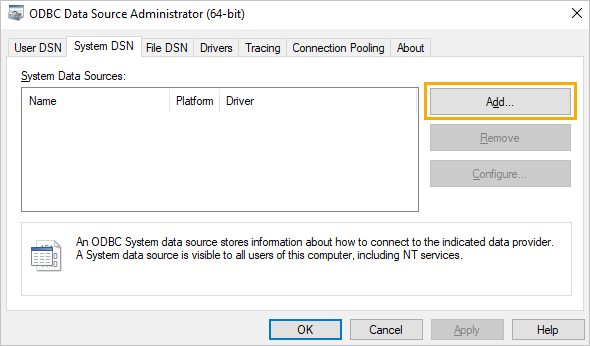
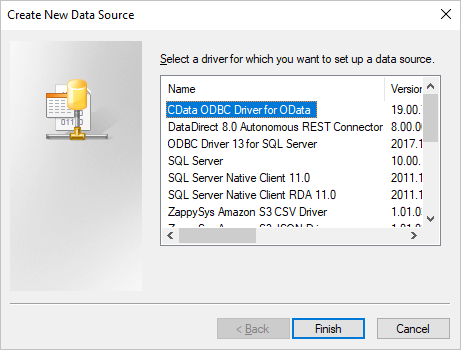
- Go to Control Panel > All Control Panel Items > Administrative Tools > ODBC Data Source Administrator (64 bit), and then select Add.
- Select the CData ODBC Driver for OData driver, then select Finish.
- In the DSN Configuration dialog box, enter the Data Source Name and the following connection properties: URL, User, Password, OAuth Version, OAuth Access Token URL, OAuth Refresh Token URL, OAuth Grand Type, Initiate OAuth, and OAuth Client ID.
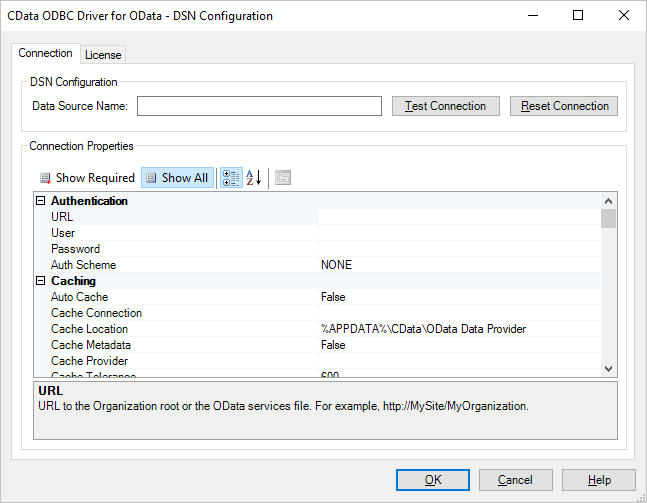
- Select Test Connection. Then, you will see the notification about the successful connection.
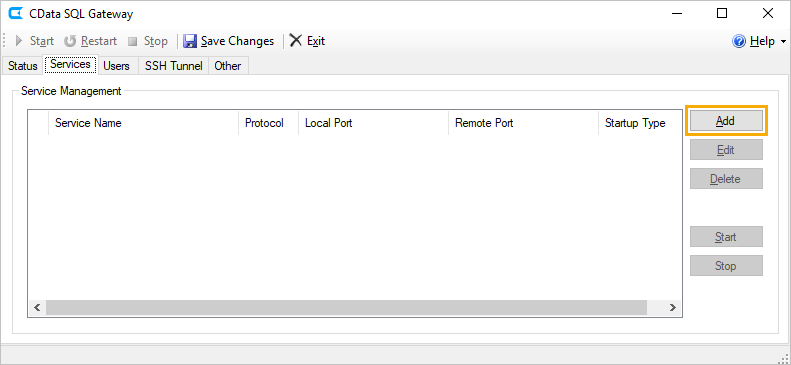
- Run CDATA SQL Gateway.

- Go to the Services tab, and then select Add.
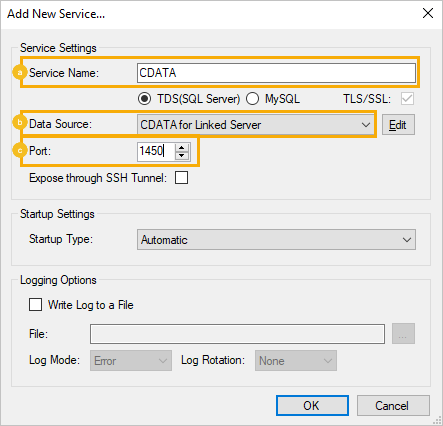
- Specify the following settings, and then select OK:
- Enter Service Name.
- Select Data Source.
- Enter the Port value.
- Go to the Users tab, then select Add.
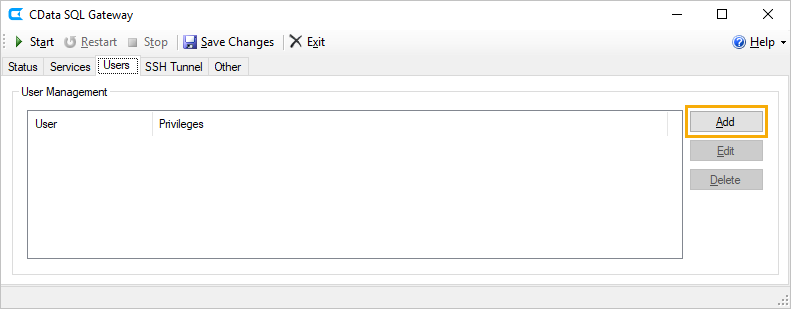
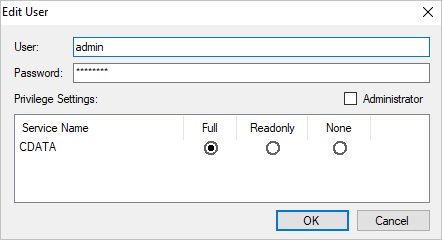
- In the Edit User window, specify the following settings, and select OK:
- User: type your username.
- Password: type your password.
- Privilege Settings: next to CDATA, select Full.
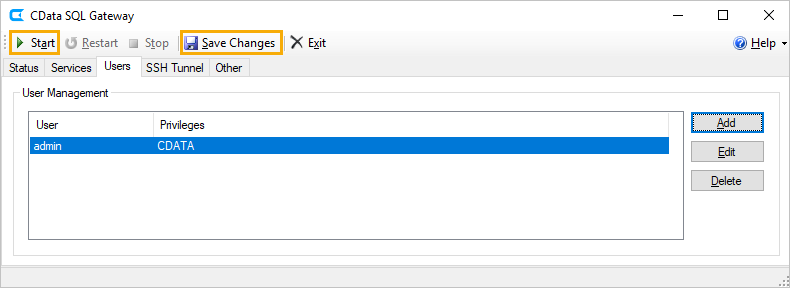
- Select Save Changes, then Start.
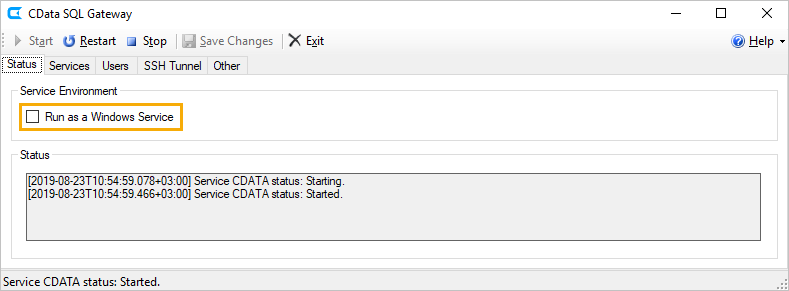
- After the Service CDATA process has started, run it as a Window Service.
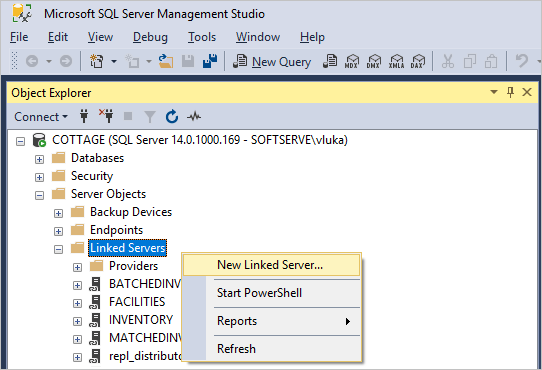
- Go to Microsoft SQL Server Management Studio. Here, right-click the Linked Servers folder and select New Linked Server.
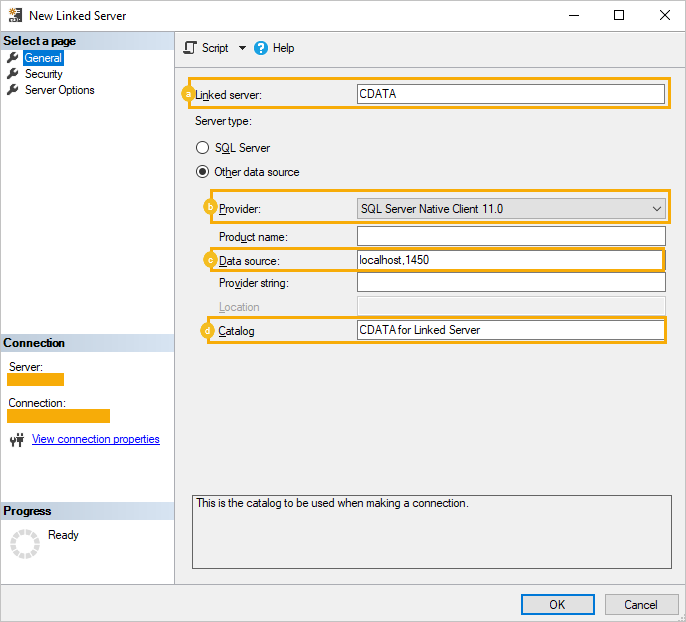
- Specify the following settings:
- Linked Server: name of the server
- Provider: SQL Server Native Client 11.0
- Data Source: localhost.1450
- Catalog: CDATA for Linked Server
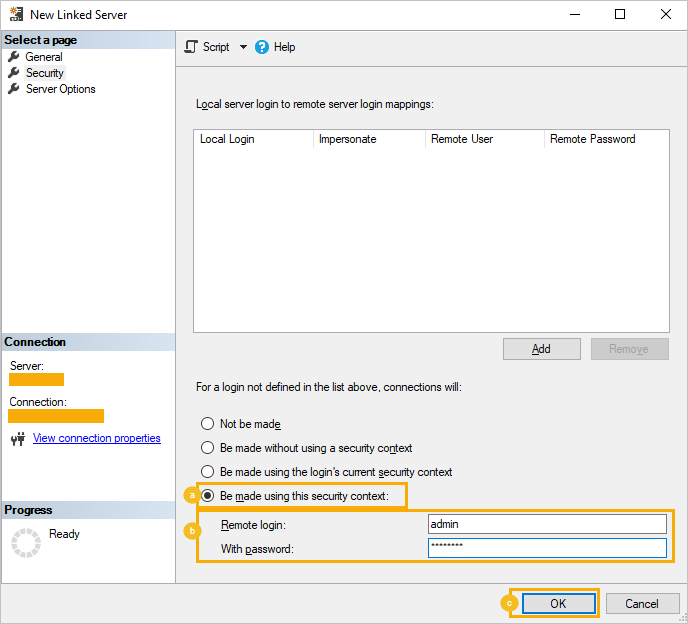
- Go to the Security tab. Here, do the following:
- Select Be made using this security.
- Fill in the Remote login and With password fields.
- Select OK.
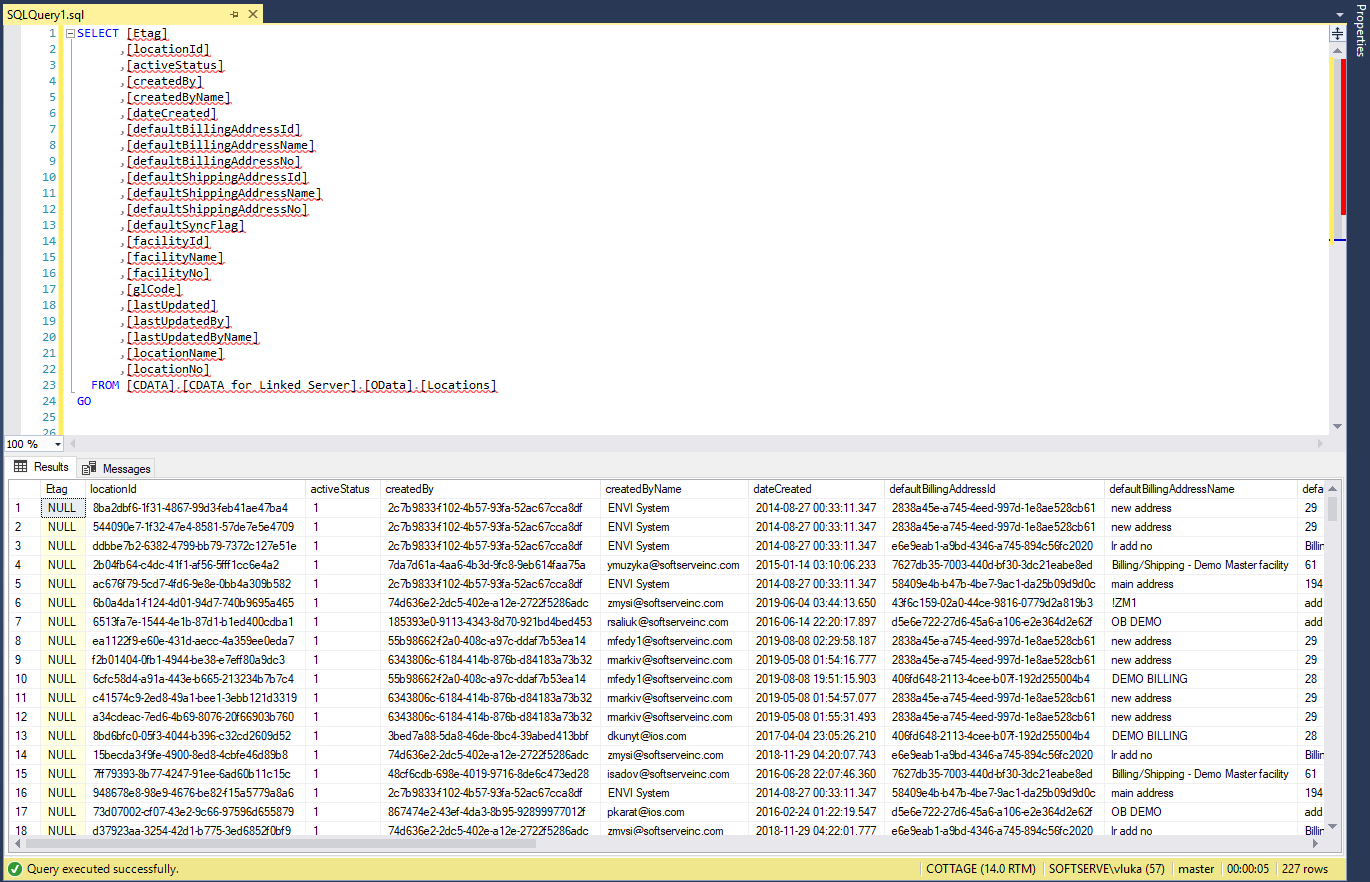
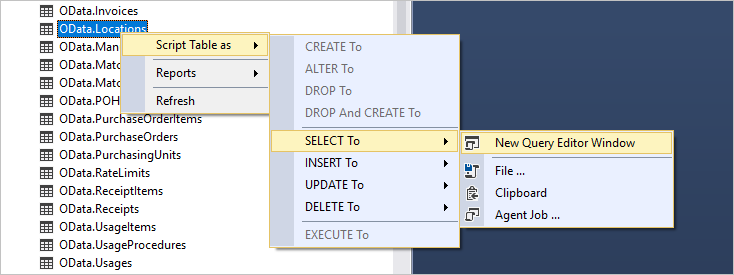
- Right-click a needed table, then select Script Table as > Select To > New Query Editor Window.
 As a result, you’ll see the following table: